How to Manage Drives Using Drive Tools

0
In the previous post I have posted possible problems and their solutions while operating computer and its windows operating system. In this post I am going to write some ideas or tips to manage drives using drive tool in windows. Drive tools manages drives which helps to run them smoothly. You can optimize the drive to defrag them, run clean up to remove unnecessary files and format to remove all files from drives.

How to Manage Drives Using Drive Tools

Here I have explained in detail with steps to manage drives using drive tools.

# How to Format Drives in Windows
How to Format Drives in Windows
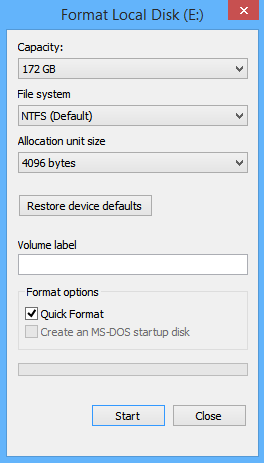
You can format the computer drives along with removable drives like pen drive, if it contents lots of unnecessary files or disk contains viruses or have any problems on computer disks or removable disks.

Here are the steps to format your Drive

  1. Go to "My computer" and select the drive which you want to format
  2. Click on Format option located on manage tab
  3. Under format option dialog box choose the type of format you want to do
  4. Click on Start button to start formatting.

OR you can format the drive just by right clicking on the drive and selecting format option.


# How to Optimize Drives in Windows


You can optimize your drives to help your computer run more efficiently. At first you can analyze the drives to find out if they need to be optimized or not and then optimized them. In optimization process the fragmented files are compressed and make more space available on disk.

Following are the steps to optimize the disk.

  1. Open My computer-select the drive and click on Optimize option located on Manage tab. 
  2. Then, drive optimization dialog box will appear. 
  3. Click on Analyze button to analyze the disk and click on Optimize button to optimize it.
    How to Optimize Drives in Windows

# How to Optimize Drives Automatically


You can optimize the drives automatically by scheduling it. For this,

  1. Open drive optimization dialog box as mentioned above and then click on "Change Setting" button. 
  2. After that, choose "Run on a schedule" option and also select its frequency then choose drives for optimization.
    How to Optimize Drives Automatically

# How to Computer Clean Up


You can clean up your disks or drives to speed up your computer, here are the steps to clean up your disk.You can do it by selecting respective drives and doing clean up using drive tools.

How to Computer Clean Up
For this, open My computer to view drives select required drive you want to clean and click on cleanup option located on manage tab.

How to Computer Clean Up


Related Posts


    Top 10 Questions that Computer Beginner may Asked

    0
    If you are beginner, even very small problems may disturb your learning process, so very miner things may help you a lot. Here I am going to write a post having 10 questions with possible problems and their solutions to answer the questions that computer beginner may asked.

    If you are just starting computing or you are not fully familiar with computer and its windows operating system, this post my helpful for you. Even if you are medium level user, some of the problems your may have faced. So you may also take benefits from this post.

    The beginners possible problems and their solutions while operating computer and its windows operating system are as follows.

    1. How to Update Computer


    If you need to update your computer, go to control panel from desktop or start menu and click on windows update then you will see the following screen, after that click on check for update. It will start to update your computer.

    How to Update Computer

    2. How to Set Update Computer Automatically


    To set update your computer automatically, from windows update window click on "change setting" option, you will see the following screen. Choose "Install updates automatically" from drop down list, then click on OK.

    How to Set Update Computer Automatically

    3. How to View Computer MAC and IP Address

    If you need to know your computers MAC address also called physical address and Internet Protocol(IP) address, you have to right click on computer icon on notification area located on task bar and click on open network and sharing center. OR go to control panel and click on Network and Sharing Center option, Click on Ethernet option and then Details button as shown below. You can view its IP address and Physical Address or MAC Address.
    How to View Computer MAC and IP Address

    How to View Computer MAC and IP Address

    4. How to Change Computer Name


    To change the name of computer go to control panel and open system option from there and then Click on Change setting option and click on change button located on computer name tab then change your computer name and click on OK. To open system properties you can right click on "my computer" and click on properties also.
    How to Change Computer Name

    5. How to Computer Print Screen


    You can easily capture your screen for print by simply pressing "Print Screen Request" key from keyboard and saving it using simple photo editing application. To do this at first open the screen which you want to save using print screen request. Press the key "Print Screen Request" and paste on any image editing application.

    6. How to Show Computer Desktop


    How to Show Computer Desktop 
    If you are working on different multiple windows, you may need to close all the windows and may need to open the desktop items. You can show computer desktop by simply right clicking on task-bar and clicking on "show the desktop" option.


    7. How to Record Voice in Computer


    How to Record Voice in ComputerIf you need to record voice in computer, you can do it by using sound recorder services of windows. For this go to start menu and search for sound recorder, open and record using it. You can also record by installing other applications on computer. 


    8. How to Change Computer Password


    How to Change Computer PasswordIf you are using some user name and password to login into your computer and if you need to change its password for some region, you can do it by using user account option located in control panel. In windows 8, you can do it from account option on PC settings. After you have gone to the accounts option click on sign in option and then click on change button. Now you can change your password.
    How to Change Computer Password


    9. How to Computer Clean Up


    If you wanted to clean up your disks or drives to speed up your computer, you can do it by selecting respective drives and doing clean up using drive tools. For this, open My computer to view drives select required drive you want to clean and click on cleanup option located on manage tab.

    10. How to Lock/Unlock Computer


    How to Lock/Unlock Computer

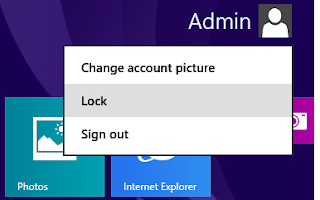
    If you are using your computer, have to go away for some time, you can lock your computer until you return back. You can do it by simply going to start then clicking on user account name and lock option. You can unlock it by simply entering your password there.


    Related Posts


    How to Know Your Computer Configuration Easily

    0
    If you don't know your computers configurations like how much RAM is used, which operating system was installed, what's the name of computer, you can find them easily from DirectX Diagnostic Tool. By using this tool you can find not only these things but also know about the configuration of display adapter, sound and input devices. Here is a sort and very easier method to find out those information about computer configuration.

    How to Open DirectX Diagnostic Tool


    To open DirectX Diagnostic Tool, go to Run and type "dxdiag" then click on OK. The DirectX Diagnostic Tool dialog box will appear which gives information about the following.

    On the System Tab, you can find the following information.


    Machine name:         It includes the name of your computer.
    Operating System:   It includes the name of Operating system installed on your computer.
    Language:                 It includes the language used on computer.
    System Manufacturer:  It includes the manufacturer name of system.
    System Model:               It includes model number of the system.
    Processor:                      It includes the information about the processor.
    Memory:                        It includes how much RAM is used on computer.

    How to Open DirectX Diagnostic Tool


    On the Display Tab, you can find the following information.


    Card name:        It is the name of Display Adapter
    Manufacturer:   It is the name of manufacturer of display adapter.
    Chip type:          It is the type of Graphics Chip
             
    How to Open DirectX Diagnostic Tool


    On sound Tab, you can find the information about your sound devices attached on computer.

    And the last Tab of DirectX Diagnostic Tool is input, which includes information about input devices used in computer.

    How to Know Computer Supports 32-bit or 64-bit


    There are different methods to get information about your processor that supports 32-bit or 64-bit and the installed operating system is 32 or 64 bit, I have presented some of them below.

    1. At first, go my computer, right click on it and click on properties option or go to control panel and click on system option.
    How to Know Computer Supports 32-bit or 64-bit
    2. Here the system properties window will appear, on the system block you can find the information about your system model, processor type, installed memory(RAM) and system type which includes what type OS installed 32 or 64 bit and processor supports 32 or 64 bit. Here in the image below system has 32-bit operating system and have 64-bit processor, so in this computer 64-bit operating system can be installed.

    How to Know Computer Supports 32-bit or 64-bit

    How to Get System Information on Windows 8

    On windows 8 you can find system information from PC settings also. You can get PC information from PC settings with the following steps.


    1. At first, search PC setting from window start and open it.
      How to Get System Information on Windows 8
    2. Go to PC and devices and then PC info.   
    How to Get System Information on Windows 8


    Related Posts


    Top 5 Free Methods to Make Your Computer Faster

    0
    If your computer runs slowly during start-up or while running application programs or browsing websites, it is possible to make it run faster even using very simple methods. You can make your computer faster by applying very simple techniques or methods. Here I am going to describe those methods along with their steps to perform it.   Follow these methods and feel your computer is running faster then before. 

    # Delete Temporary Files


    If there are lots of temporary files are stored on computer, may slow down your computer. So it may be helpful to increase the speed of your computer, if it has been deleted. Here are the steps to delete temporary files from your computer. 
    1.  At first, go to Run from start menu and type "%temp%" on it and click on OK. Then the following window will appear, delete them by selecting All.
    Delete Temporary Files

    #Remove Unnecessary Programs From Startup 


    The application programs which are placed on startup runs while starting your computer,  which may slow down your computer. You can remove unnecessary programs from startup using the steps given below.
    1. Right click on Task bar and click on task manager as given below.
      Remove Unnecessary Programs From Startup
    2. Then Task manager dialog box will appear, click on startup tab where the programs are listed which are placed on startup. Click on the program which you don't want to run on starting and then click on Disable button.
      Remove Unnecessary Programs From Startup

    # Empty Your Recycle Bin and Clear Your Desktop


    Deleting items from recycle bin and removing unnecessary files from desktop also helps to improve the speed of you computer.
    To make your recycle bin empty, go to recycle bin which is located on desktop and go to Manage tab and click on "Empty recycle bin".
    Empty Your Recycle Bin and Clear Your Desktop

    # Uninstall  Unnecessary Application Programs


    You can also make your computer faster by uninstalling unnecessary application programs from your computer.

    To uninstall programs from your computer, at first go to control panel and click on uninstall program located under programs, select the required program you want to uninstall and click on uninstall as given below.
    Uninstall  Unnecessary Application Programs


    # Delete Browsing History and Internet Cookies


    Deleting browsing history and internet cookies also helps to improve the speed of your computer. Here are the steps to delete browsing history from your computer.

    1. To remove history and cookies from Mozilla firefox, go to menu and click on history button as given below.
      Delete Browsing History and Internet Cookies
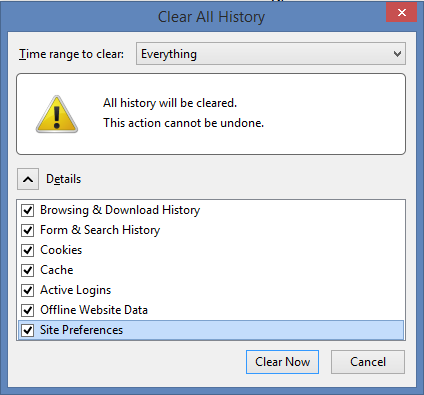
    2.  Then clear history dialog box will appear, select everything to clear and click on Clear now button.
      Delete Browsing History and Internet Cookies
    3. To remove history and cookies from Google chrome, go to menu and click on history button, then the following dialog box will appear "select the beginning of time" and click on clear browsing data as given on image below.
      Delete Browsing History and Internet Cookies on chrome

    Related Posts


    How to Keep Computer from Sleeping

    0
    When the computer is not being used for some duration of time i.e. 5, 10 or 15 min, the screen will automatically turned off to save the power used by the computer. It's happened due to what settings are saved on power option on control panel. From this option, you can choose power and display settings that you want on your computer. In this post I am describing "how to keep computer from sleeping" and the other methods to adjust power setting for computer.

    How to Change Sleep and Display Setting


    You can change sleep and display setting to make computer how long time it will display while it is not being used. Here below explained with steps to change its setting.
    1. At first, go to control panel and choose power options. On the power option window, you can see different power plans like balanced, power saver and high performance.
      How to Change Sleep and Display Setting
    2. Click on the option "Choose when to turn off the display" from the left side pane of this window.
      How to Keep Computer from Sleeping
    3. On the Edit plan setting window, you can choose turn of display time for your selected power plan form 1 minute to 5 hours as your requirement also there is a option Never, to never sleep the computer.
      How to Keep Computer from Sleeping

    How to Change Advanced Power Setting


    Along with sleep and display setting you can change other settings also on advanced power setting. You can change setting for different power plans and can also create new power plan.
    1. As given on the first step to change sleep and display setting, open power option window. Click on change plan setting option for which power plan you want to change setting and then click on "change advanced power setting".
    2. On the Advanced setting option you can change the settings for turn off hard disk, slide show, wireless adapter, sleep, display and multimedia.
      How to Change Advanced Power Setting
    3. From power buttons and lid option, you can change the setting for power button action and sleep button action.
    4. On processor power management option, you can choose for minimum processor state, system cooling policy and maximum processor state.

    Related Posts


    How to Share Printer for Computers on LAN

    0
    Not only from Network printer, it is possible to print from other computers on LAN by sharing local printer connected on one computer on Local Area Network. To do this, you have to share the printer on LAN and have to install the shared printer on the computer from which you want to print. In this post I am describing the methods and steps for sharing printers on LAN.

    How to Share a Local Printer on LAN


    Here are some steps for sharing a local printer on Local Area Network.  
    1. At first, Go to the control panel and click on "view devices and printers" located under Hardware and Sound option.
    2. Under the printers category right click on printers name which you want to share and  choose on "printer properties" option. 
      How to Share a Local Printer on LAN
    3. Then printer properties dialog box will appear as given below, click on sharing Tab.
      How to Share a Local Printer on LAN
    4. Select on the "share this printer" option also give the name for the printer which is being shared as given on the picture below. 
    5. After completing all of the task click on OK to close the dialog box.

    How to Install Shared Printer in Client Computer on LAN


    To complete the steps for sharing local computer on LAN and to print through client computer, you have to install this shared printer on the client computer also. The required steps to complete this task are given below.
    1. At first, Go to the control panel as mentioned on the previous steps and click on "Add printer" option.
      How to Install Shared Printer in Client Computer on LAN
    2. The wizard started to search for installed shared printers on LAN, if the printer you have to install is listed select it and go to next until finish.
      How to Install Shared Printer in Client Computer on LAN
    3. If the printer is not listed from searching, Click on the option "The printer that I want isn't Listed".
    4. On find a printer by other options click on "select a shared printer by name" and click on Browse button.
      How to Install Shared Printer in Client Computer on LAN
    5. Open the computer from where you want to install printer, here you may ask for login if the computer having printer is protected by a password.
    6. After opening computer, select the desired printer you want to install and click on next in wizard until finish.
      How to Install Shared Printer in Client Computer on LAN
    7. Now your printer is ready, you can print any document selecting on this printer but you should be noted that the host computer must be turned on while printing.


    Related Posts


    How to Share Drive Folder and File in Computer Network

    0
    You can share drives, folders and files of your PC to your Computer Network, after sharing these, you can access them from another computers in same computer network. It can be shared for specific computer or for everyone as your requirement. But you should be careful for security of your files, folders and drives while sharing them on the network. Today I am going to describe some methods for sharing drives, folders and files in computer network.

    How to Share Drive in Computer Network


    You can share your computer drive in computer network, using the following methods.


    1.   At first Go to "My Computer" from Desktop or Start Menu and Open it.
    2.  Right Click on the required drive which you want to share and Choose "Share width" and the "Advanced sharing.." As given below.
      How to Share Drive in Computer Network
    3.  After that, drive properties window will appear, then click on "Advanced sharing" button.
    4. That displays advanced sharing dialog box then select on the "Share this folder" check box, give required comments and the share name as given on the screen below.
      How to Share Drive in Computer Network
    5.  After completing all of these click on OK button.

    How to Share Folder and Files in Computer Network


    You can share your computer folders and files in computer network, using the following methods.

    1.  At first, Go to your folder or file and right click on it, Choose "Share with" option and then click on "Specific people.." as on the screen below.
      How to Share Folder and Files in Computer Network
    2.  On the File sharing dialog box, choose people to share with, you can select specific computer or can choose everyone and click on "share" button at last.
      How to Share Folder and Files in Computer Network
    3.  If you want to Stop sharing them on computer network, Go to step 1 and choose "Stop sharing" option instead of "Specific people".
    4.  After clicking on "Stop Sharing" option, you can see file sharing dialog from where you can choose the option "Stop Sharing" - To remove all the permissions for all the people and "Change Sharing Permissions" option - To add or remove people or change the permission.
      How to Remove Shared Folder and Files in Computer Network
    5.  While changing permissions, you can do as given on the step 2.  

    Related Posts


      يتم التشغيل بواسطة Blogger.